Contacts
Our storage house and office
Nemravka.cz
(areál
K
251 62 Tehovec-Vojkov
How to find us
e-mail: info@nemravka.cz
+420 734 742 604
You can do a purchase or pick up your orders.
Opening hours:
Mo - Fr 8 - 14
General information
info@nemravka.cz
Information about your orders
objednavky@nemravka.cz
+420 734 742 604
Wholesale
velkoobchod@nemravka.cz
Information about polymer clay
petra@nemravka.cz
Information about scrapbooking
scrapbooking@nemravka.cz
- Home
- Useful Links and Tips
- About (Polymer) claying
- POLYMER CLAY PATCHWORK 2016
- Saucer Patchwork
Saucer Patchwork
For the May patchwork design I drew inspiration not only from my polymer-fancier friend Helča (Mahel) and her patchwork pattern. I wanted to call it "Frankfurt wheel" but she insisted on the name "Dresden saucer".
I was also inspired by the mass of silkscreens I pile at home (I really do) and I adore them.
Finally, the spring weather invites us to play with vibrant colours. However, I love these colours throughout all the seasons of the year.
What you need:
paper, pencils, cutter (I am using a round cutter, 6.5 cm in diameter) and scissors
common polymer clay tools – pasta machine, etc.
6 matching colours of polymer clay, I use Premo
silkscreens – I have six various patterns, but you can alternate only two designs if you want
acrylic paint – I am using white colour, it is a joint element of the whole project. However, you can choose any colour you like.
card for application (an old credit card)
bowl with water / nearby washbasin
X-acto knife
deli paper
small cutters – round or other shapes
metal / glass bowl, ca 20 cm in diameter (Ikea)
liquid polymer clay (TLC)
needle / metal stick for smoothing joints
quick dry glue
rubber string, ca 45 cm long
end caps – hooks, clasps (other components for hanging)
Procedure:
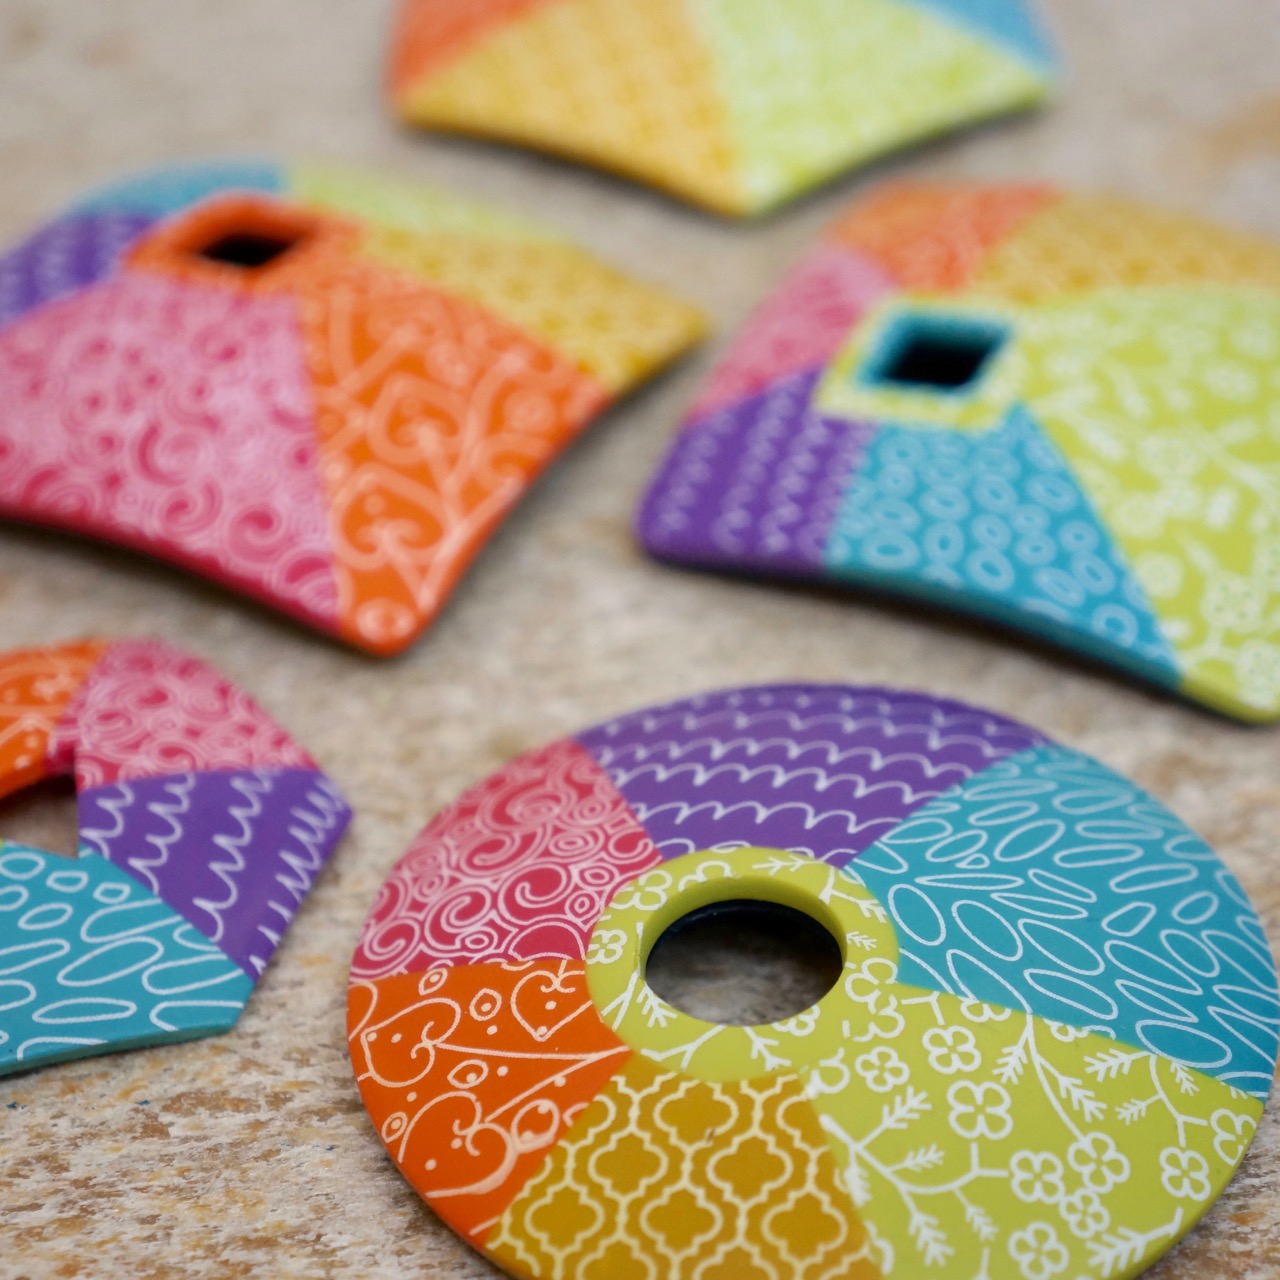
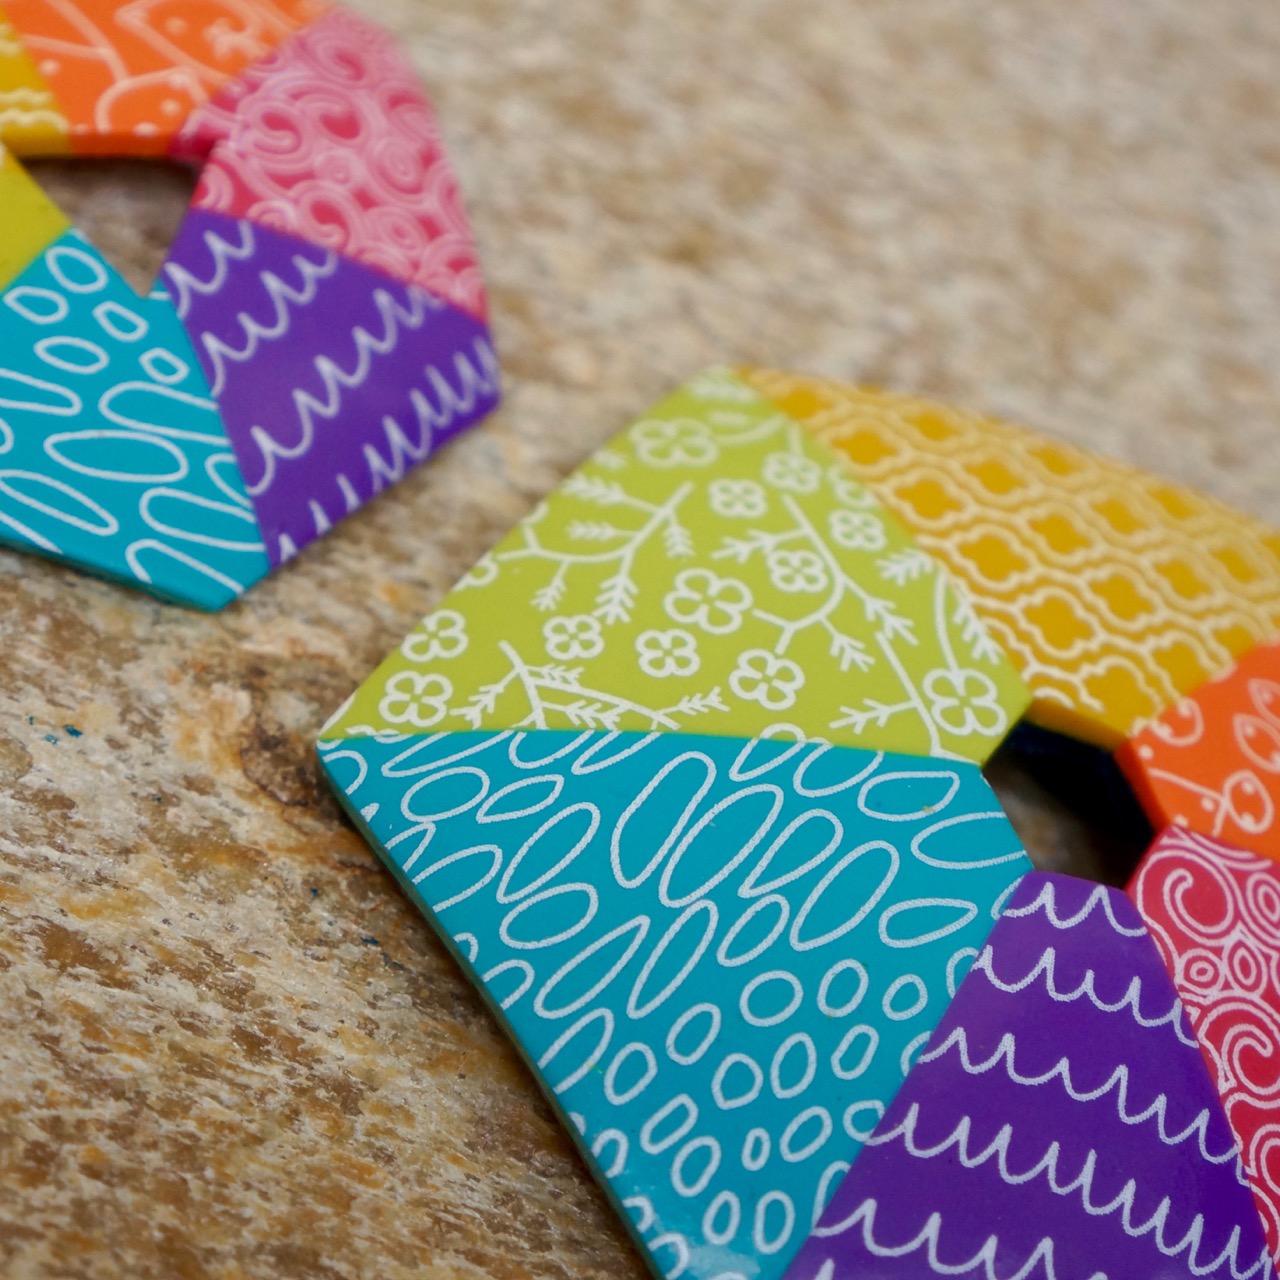
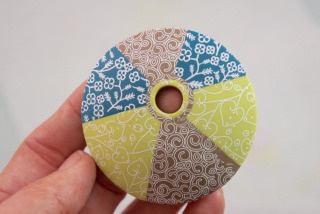
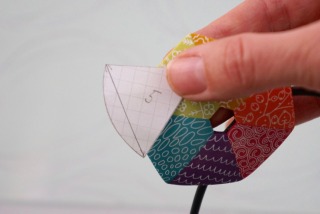
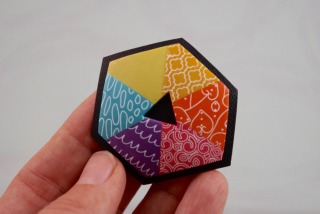
1. First of all, prepare a template for your pendant. Take a sheet of paper and trace the cutter onto it (I am using a round cutter). Then divide the shape into several sections. It looks like cutting a cake.
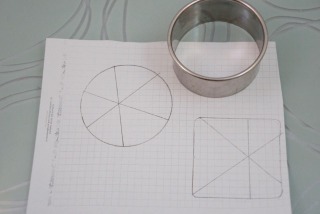
The sections are not identical on purpose. There is no central hole, some sections are larger than the others, which will accentuate the colours.
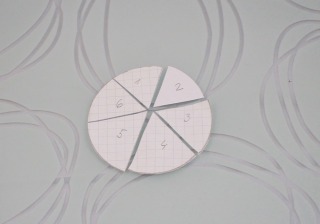
2. Give numbers to the sections – write the numbers horizontally, not around. This is helpful when putting the sections together. Cut them to pieces and reshape your future pendant.
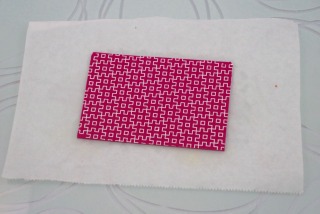
3. Condition the clay on the second thickest setting of your pasta machine. The size of the sheets corresponds with the size of the silkscreens. Apply the design of the silkscreens to the sheets. If you wonder how to do it, the directions are here. Let them get dry for 5 – 10 minutes.
4. Think about the order of the colours of your pendant and place them on the mat. Here is my tip: the colours look great when organized like a rainbow. If the colours are not not directly the primary shades of the rainbow, they are at least based on the primary colours. It means that you place two colours including the same primary colour next to each other, and continue like that with the remaining colours.
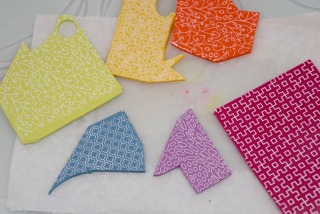
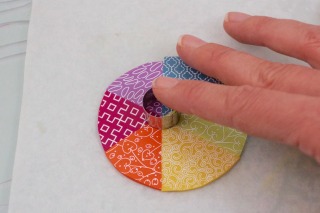
5. Now, get to cutting the clay out. Put one of the paper templates (let´s start with no. 1) on the colour sheet and cut the shape out. A solid blade is perfect for straight cuts, the X-acto knife for round shapes. Transfer the cut-out shape (let it stuck to the paper) to another sheet of paper where you are going to put the pendant together.
6. Take the template no. 2 and the corresponding colour sheet. Repeat the procedure. Place the cut-out piece next to the right side of the previous one so that you do not forget the order of the colours.
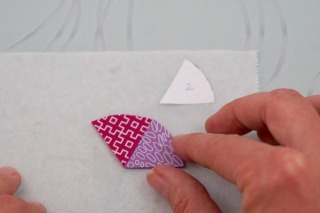
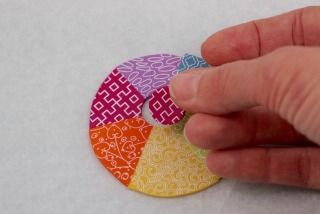
7. Repeat the procedure using all the templates and the colour sheets. Placing the last piece may be a little bit difficult. It is useful to make two semicircles out of the pieces (3 + 3) before composing the final circle. Do not rack your brains over small gaps between the pieces.

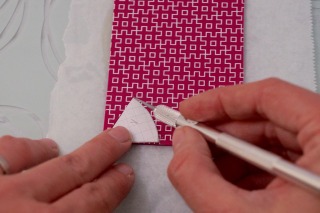
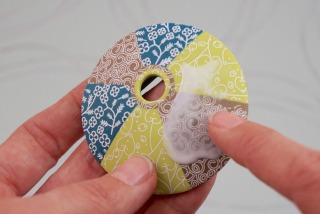
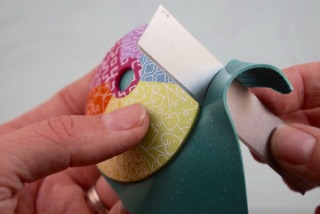
8. As soon as the pieces are ready, take deli (or other paper) and smooth out the pendant, particularly the joints. However, be careful. If you warm the acrylic paint by excess smoothing and subsequent warming, it might stick to the paper.
9. Smooth out the pendant all over the surface.
Unstick the paper from the pendant with caution. It is better to unstick the paper from the pendant than vice versa.
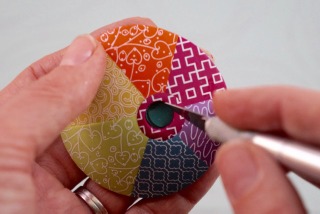
10. If you want to cut out a hole in the centre, do it with a cutter now. And if you want to border the hole with a colour frame, follow this procedure: take one of the colour sheets and cut out a round. Using the same cutter cut out a hole in the centre of the pendant. Put the new unicolour round into the hole of the pendant and smooth it out over deli. Take a smaller cutter and cut out a new hole in the middle of the round. The hole is prettily framed.
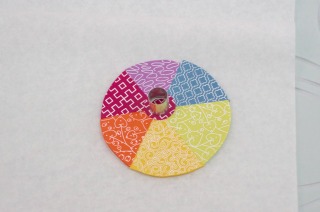
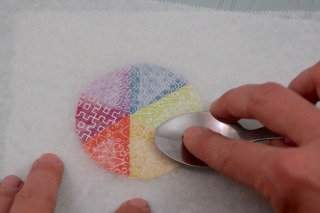
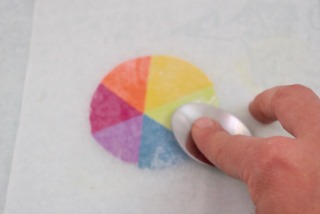
11. Finally, use the cutter which served for the paper template and cut out a regular shape of the pendant.
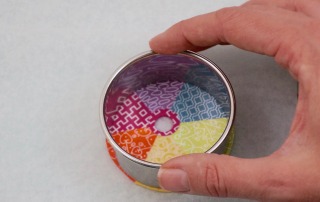
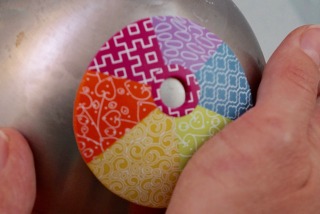
12. Attach the pendant to the metal bowl or to another rounded object and bake it following the manufacturer´s baking instructions.
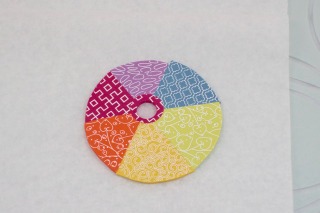
The bordering of the hole can be made out of two colours.
13. After baking and cooling you can apply some liquid clay (TLC) to the surface of the pendant in order to fix the paint. But it is not necessary. I do it because such a surface can be buffed afterwards. Moreover, women use perfumes, which may etch the paint. If you apply the TLC, bake the pendant for another 15 minutes.
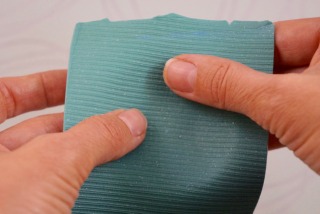
14. Now, it is time to prepare the base sheet. Condition the clay on the 3rd thickest setting of the pasta machine. The size of the sheet corresponds with the size of the pendant. Texture the surface of the sheet using cloth, sponge or sandpaper. Apply TLC to the bottom side of the pendant, lay the base sheet onto it and smooth it from the centre towards the edges.
15. If you have the hole in the centre, cut out an identical hole on the base sheet using a pointed blade. Or use a cutter. Or do not cut the hole on the base sheet at all. Trim the edges with the solid blade.
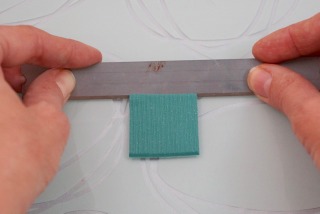
16. Cut out a 3 x 3.5 cm sheet out of the remaining base sheet. Shave off the shorter sides at a 45° angle.
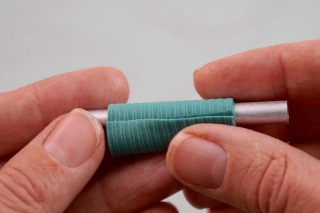
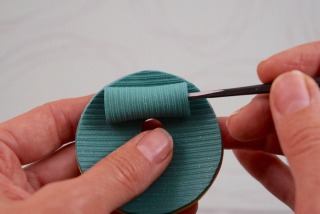
17. Wind up the clay rectangle around a metal stick / needle and make the shorter (skew) sides connect. Smooth it out with a needle.
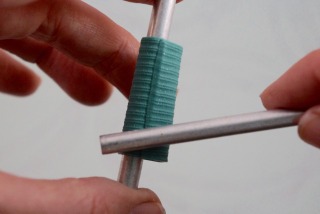
18. Apply a bit of quick dry glue to the joint of the created roll. Attach the roll to the bottom side of the pendant at the spot where the pendant is going to be hung.
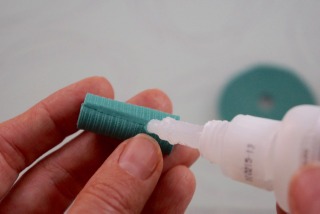
19. Since the pendant is rounded and the roll is straight, attach the roll by inserting any thin modelling tool or a needle inside and press the roll towards the pendant in the middle of the length. Bake it following the manufacturer´s baking instructions.
When the pendant is cooled, hang it on rubber string (buna cord), attach hooks or clasp and it is done.
TIPS
• If you prefer a hexagon over a round, trim the rounded sides of the triangles following the straight line drawn on the template (see the template).
• If you want to have a hexagon shape of the central hole, trim the points (ca 0.5 cm) of the triangles.

• The shape of the central hole does not have to correspond with the shape of the pendant – see the triangle inside the hexagon in the picture.
• The base sheet can accentuate the central hole and frame the pendant.
• It is only up to you how you modify the final shape of the pendant after assembling the individual pieces – use any cutter or a blade.
Enjoy spring "saucer" creation and see you next month! And do not forget to send us the pictures of your own products. At the end of the year we will draw lots and pick a winner.
Wonderful sunny days!
Petra Nemravka
PS: I will appreciate your engagement – send us a picture (info@nemravka.cz) of your polymer clay patchwork. At the end of the year we will draw lots and pick a winner. The winner gets polymer clay and other tools and material valued at CZK 3,000.